In this syringe icon tutorial you will learn how to create Syringe icon with Adobe Illustrator CS5, there is new tips and techniques that will help creating objects with adobe illustrator. if you fried from the syringes this tutorial not for you :P, hope you find this tutorial useful ;).
Step 01
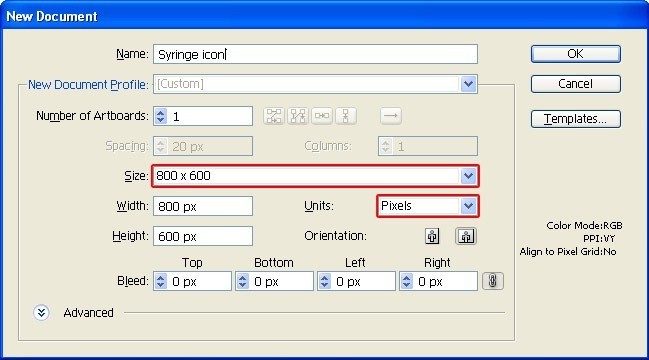
Create new file with size 800*600 and select Pixels unit.
Step 02 Drawing draft
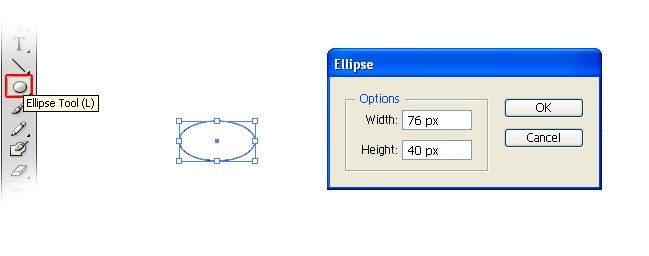
Select the Ellipse Tool and hit left click on the stage and set the width:76px and height:40px then click OK.
Step 03
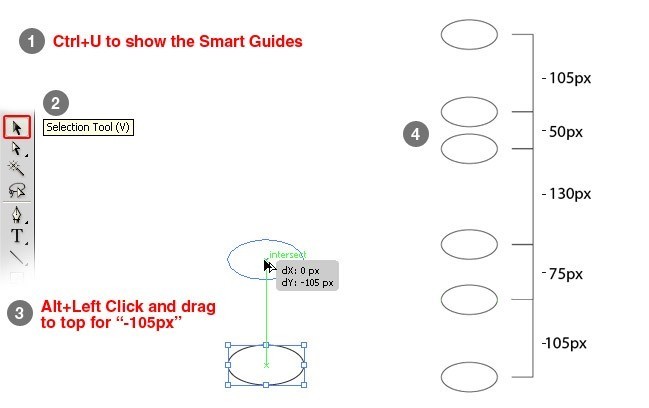
Now show the Smart Guides by press Ctrl+U, and select the selection tool, then press Alt+Shift and select the circle and drag to the top about -105px, you will notice that showing rounded gray box and green lines that’s appear when you show the smart guides, now duplicate this circle 5 times with the following specifics.
Step 04
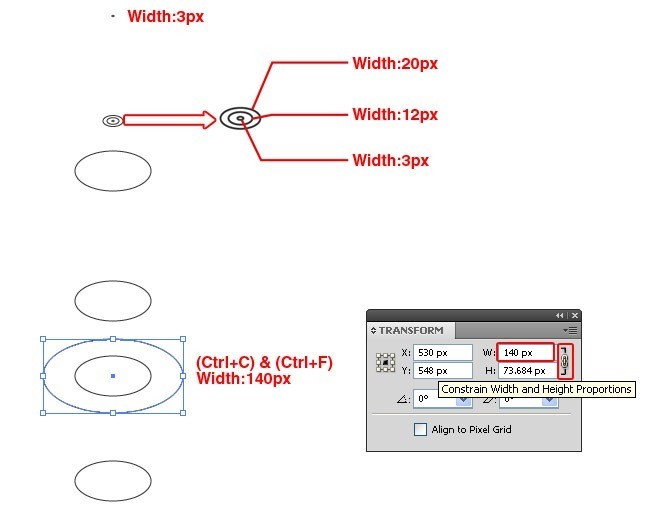
in this step we need to resize the circles, select the circle2 from the bottom and copy this circle (Ctrl+C) then paste in place (Ctrl+F) then open the Transform Pallet (Window>Transform) and click on the (Constrain width and height proportions) and set the width:140px, do that with the circle5 and circle6 with the specifics shows here:
Step 05
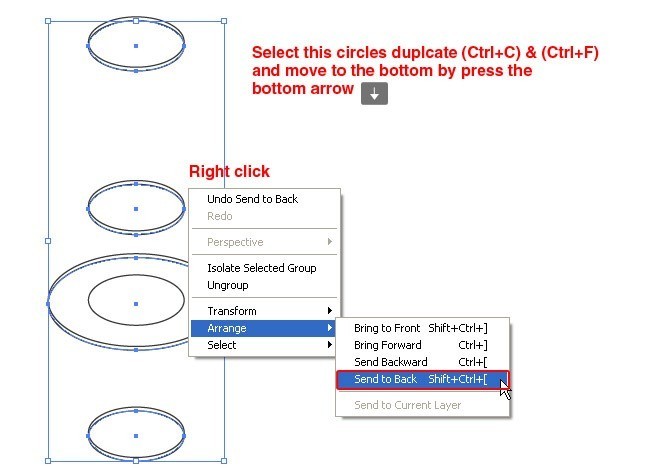
Select first 4 circles from bottom, duplicate them (Ctrl+C) and paste in place (Ctrl+F) and move them to the bottom about 3 pixels, then hit right click Arrange > Send to Back to send them behind all the objects.
Step 06
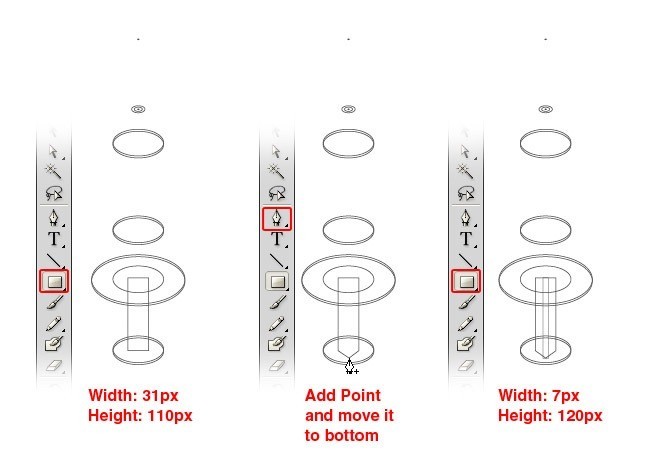
Draw a Rectangle in bottom with width:31 and height:110px, then select the Pen Tool and add point on the bottom center of the rectangle. then select the direct selection tool and select this point and move it to bottom about 10px, the draw another rectangle with width:7px and height:120px.
Step 07
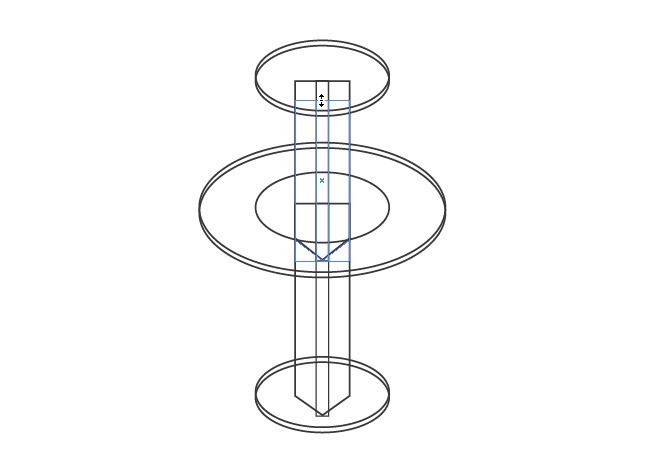
Duplicate rectangle and resize it as showing here:
Step 08
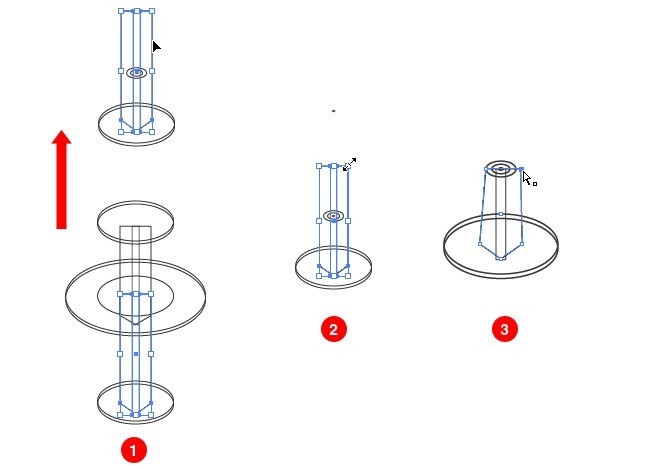
Duplicate the same shapes to the top, and then resize them by selection tools, then by the direct selection tool close the point to the circle.
Step 09
Draw a rectangle between the top small circles with 3px width, the scale and rotate the top circle as showing here:
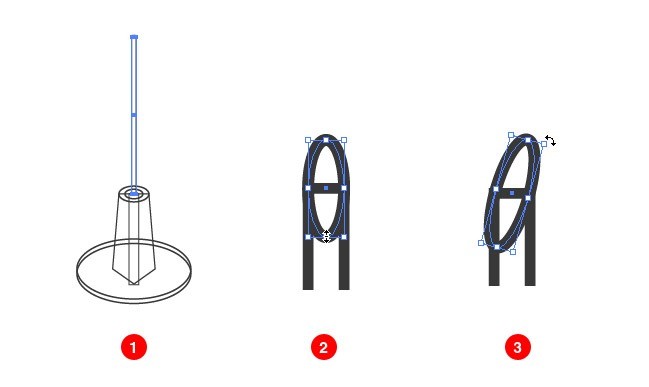
Step 10 coloring
Select first circle from the bottom the lower one, and click on the gradient icon then click on the stroke and click on none icon, then select the gradient tool and set the specifications as following:
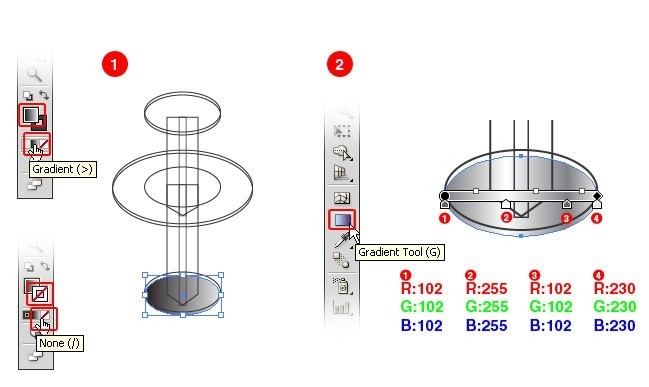
Step 11
now select all the lower circles and select the Eye dropper tool then click on the colored circle, to apply the same gradient to all selected circles.
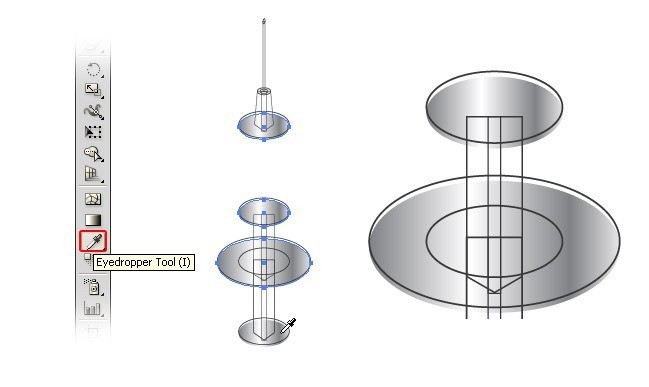
Step 12
This time we want to color the upper circles, select the upper circle from the bottom then the Eye dropper tool the click on the lower circle, then select the Gradient tool and hover the cursor to the right Point that will show the rotation icon click and hold the left click and drag to the bottom to rotate the gradient.
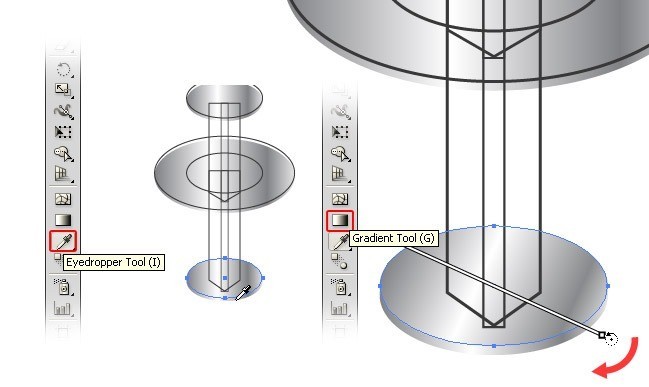
Step 13
Do the same with upper circles.
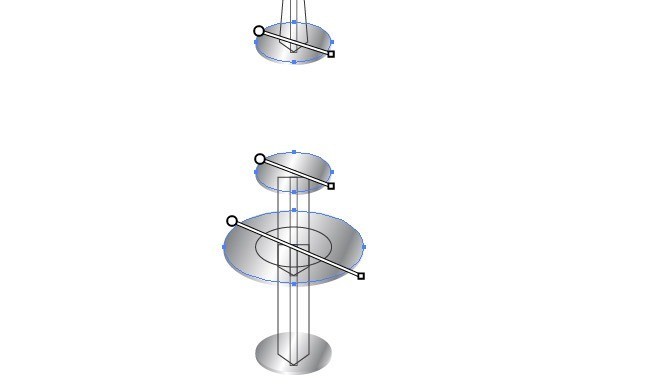
Step 14
now apply the gradient to the rectangles below.
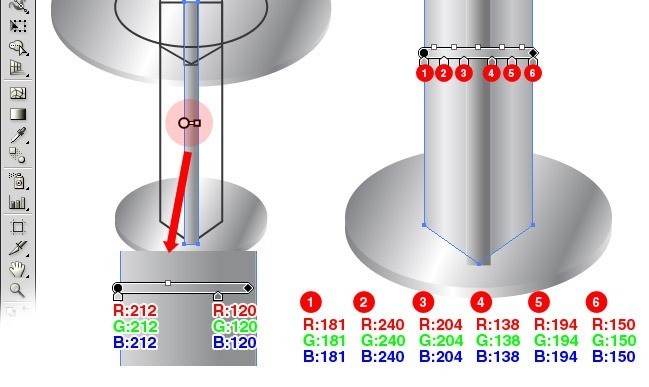
Step 15
Group the bottom part rectangles and circles by select them and press Ctrl+G, and set them behind all the object Press Shift+Ctrl+[ or right click Arrange>Send to back
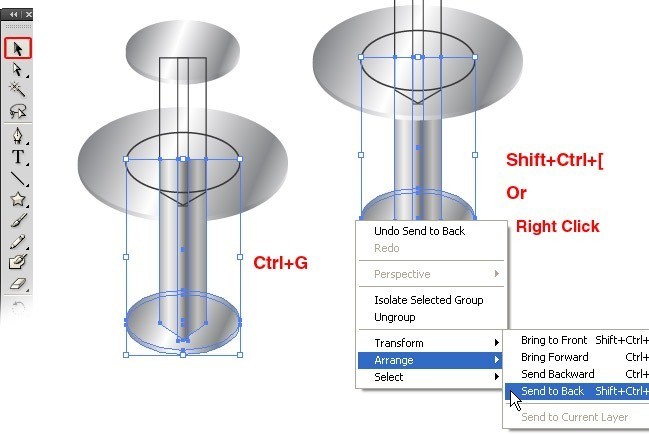
Step 16
Apply the gradient to the upper rectangles, select the small rectangle and pick the Eye Dropper tool then click on the below small rectangle, do the same with larger rectangle.
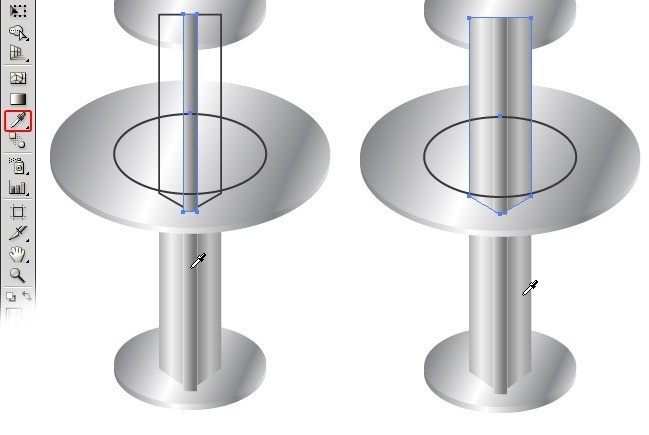
Step17
We need to create a mask to hide the bottom part of the upper rectangles, so duplicate the circle by select it and Ctrl+C + Ctrl+F then move it to the right, the select the top point and by the Direct selection tool and hit delete key, then select the Pen tool and points to complete the mask.
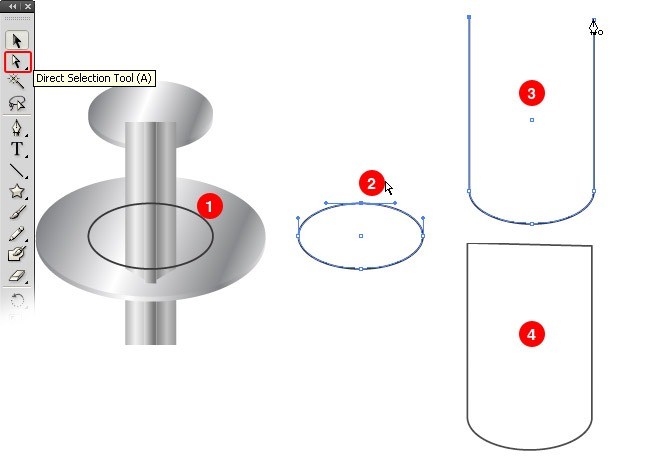
Step 18
Move back the mask to the circle, then group the upper rectangles Ctrl+G then select this rectangles and the mask and hit Ctrl+7 to make the mask on the rectangles.
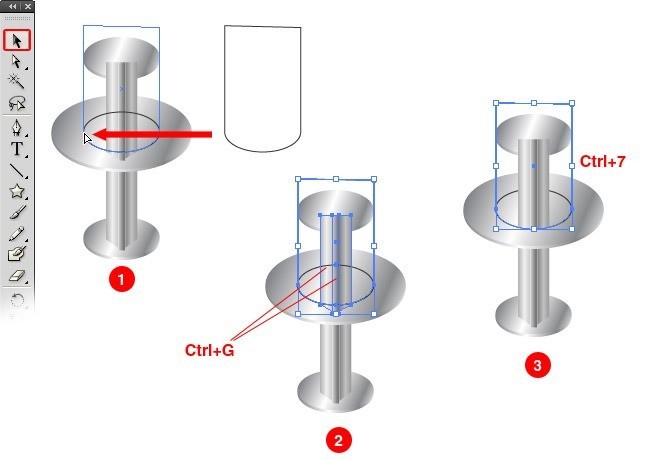
Step19
Select the tow circles that above the rectangles and click right click Arrange > Bring to front.
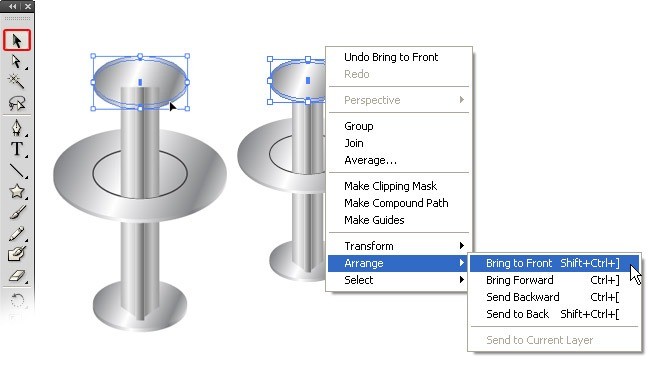
Step 20
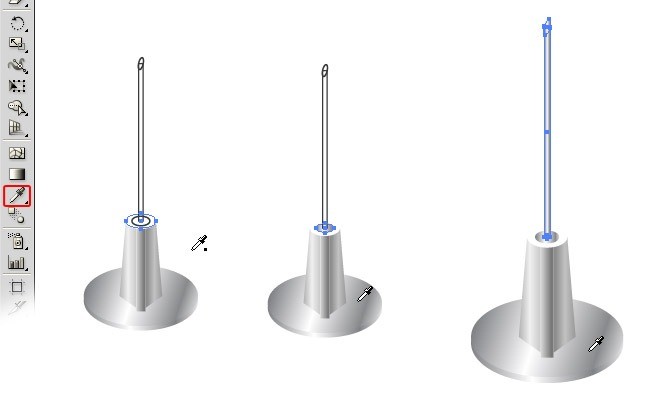
Select the top small rectangle and select Eye dropper tool, then click on the bottom rectangle, do the same with the larger rectangle, then by the Selection tool select the upper part and hit Shift+Ctrl+] to move it up all the parts.
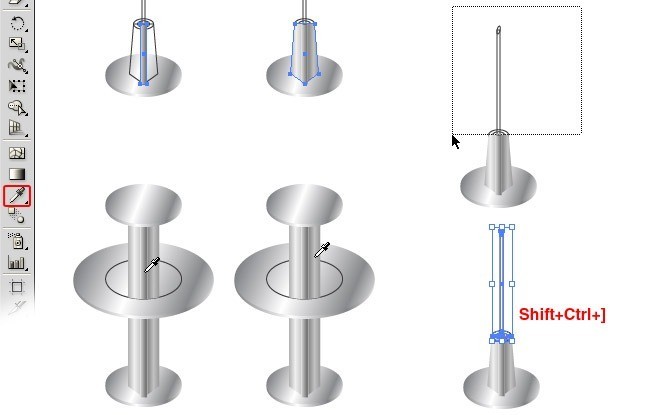
Step 21
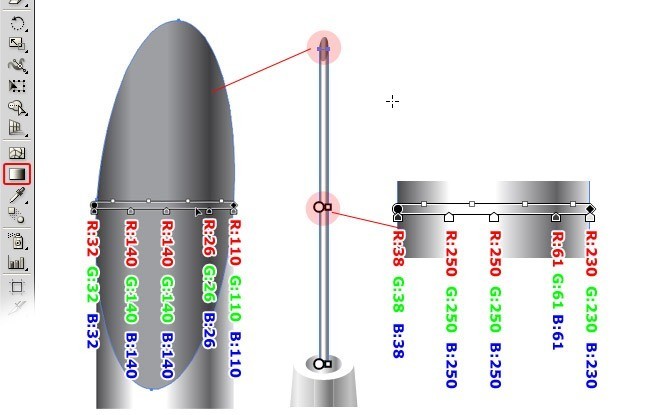
Set the Gradient as showing on this image
Step 22
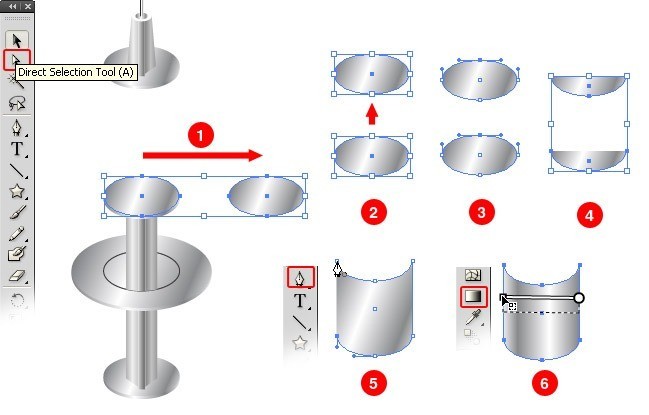
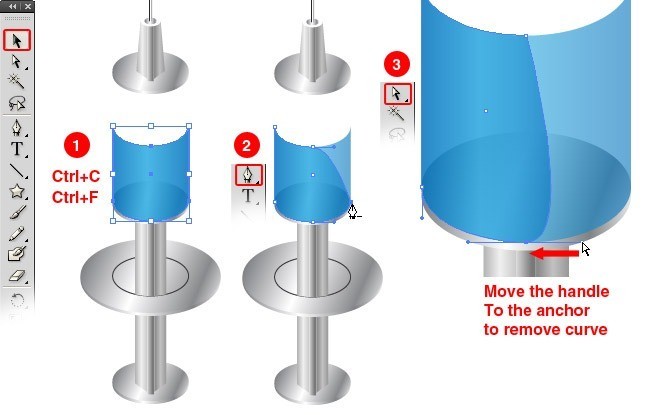
1- By the selection tool select the circle and click Ctrl+C and Ctrl+F then move the duplicated circle to the right 2- as point1 but move it to top 3- By direct selection tool select the upper points 4- hit delete to remove this point 5- Select Pen tool and connect between the points. 6- select the gradient tool and hit shift and click from the right to the lift.
Step 23
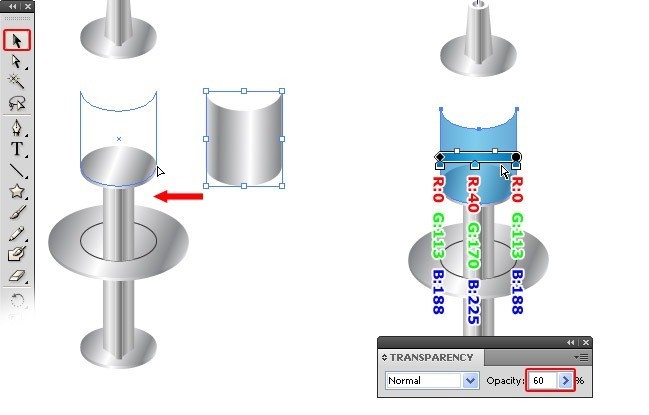
By selection tool just move back the shape, and select the gradient tool and color the shape as the following:
Step 24
Select Pen tool and hold on the shape point will appear the pen tool with minus icon, click on the point to remove it. then select the direct selection toll and move the handle to the anchor, do that to the top anchor and the bottom.
Step 25
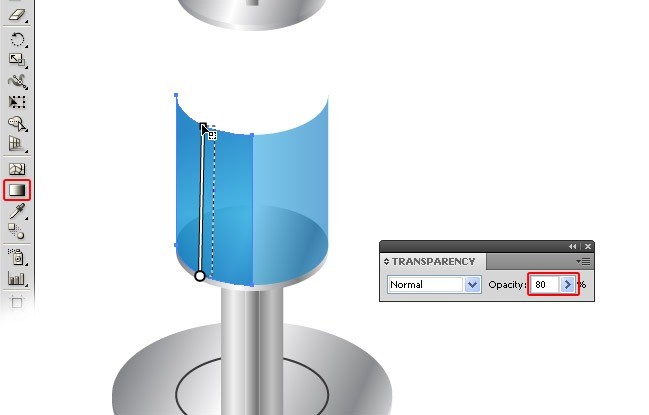
Select the Gradient tool and click from the bottom and keep pressing on shift key drag to the top and release the lift key then the shift key. open the transparency pallet window>Transparency, then put the Opacity 80%.
Step 26
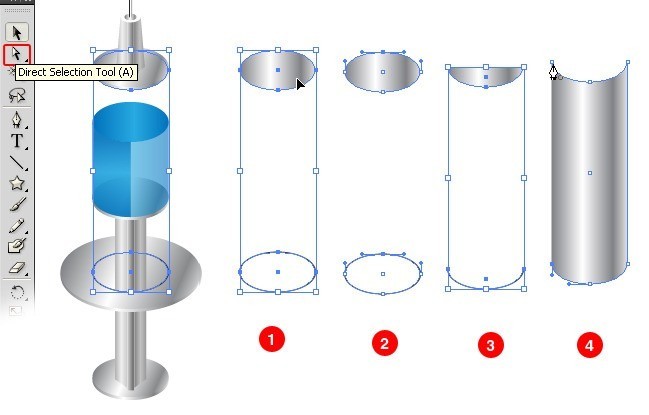
Same we did in step22!
Step 27
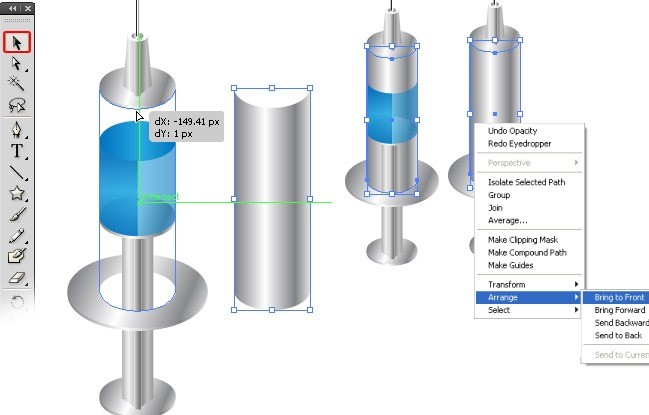
Move the shape back by the selection tool, and send it above the object Shift+Ctrl+] or right click Arrange>Bring to Front
Step 28
Apply the gradient as below and make the Opacity:20%.
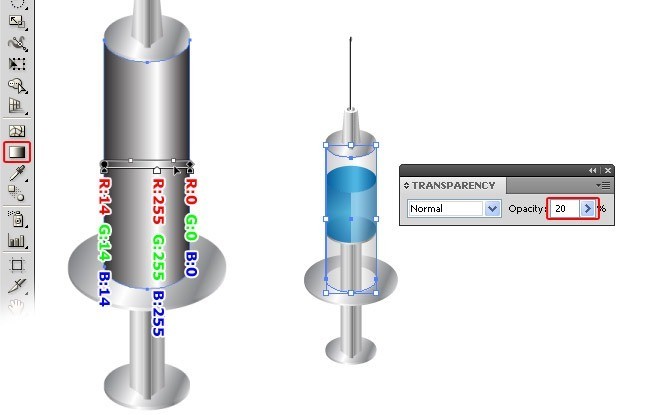
Step 28
Keep selecting the glossy then click Ctrl+C and Ctrl+F and resize the duplicated shape, then by the direct selection tool select the bottom point by click and hold shift key when you select all the bottom anchors move by the down arrow key.
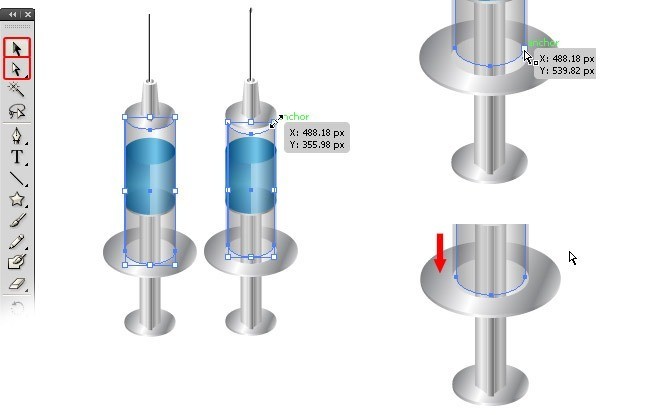
Step 29
Before you move the top point, select the upper part and then group them Ctrl+G and send them above the all the objects Shift+Ctrl+], then select the top points and move them to top keep them hidden under the top part.
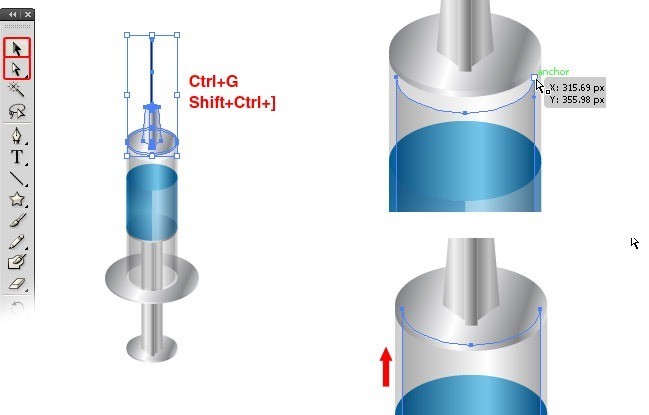
Step 30
By selection tool select the gloss part and lock the Ctrl+2 to unlock Ctrl+Alt+2, then select the Blue part, maybe you select the mask layer that we create in Step18 hold shift and click on it to release it.
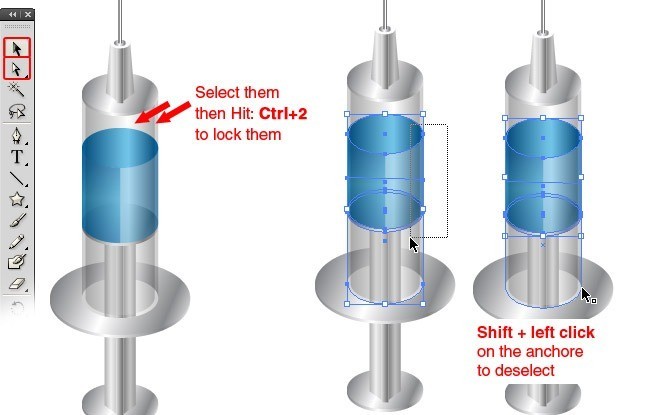
Step 31
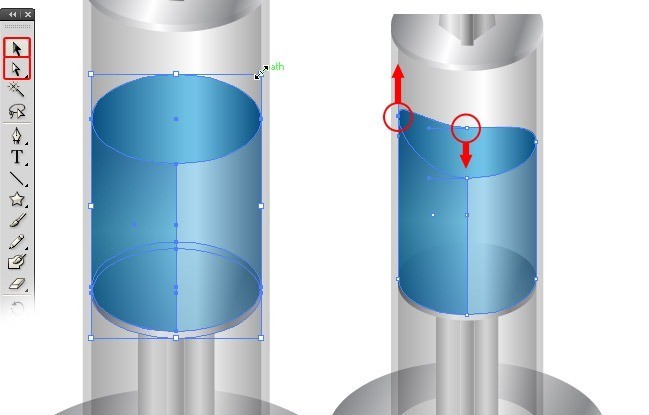
Group the blue parts Ctrl+G, then resize it to as the small gloss part, then by direct selection tool select the left anchors and move to up and top center anchor and move to down.
Step 32
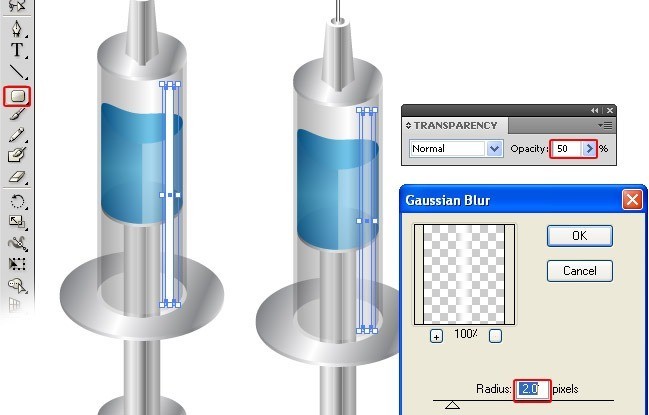
Create Rounded rectangle as below and make the Opacity50% then from Effect>Blue>Gaussian Blur set the Radios value 2Px and hit OK.
Step 33
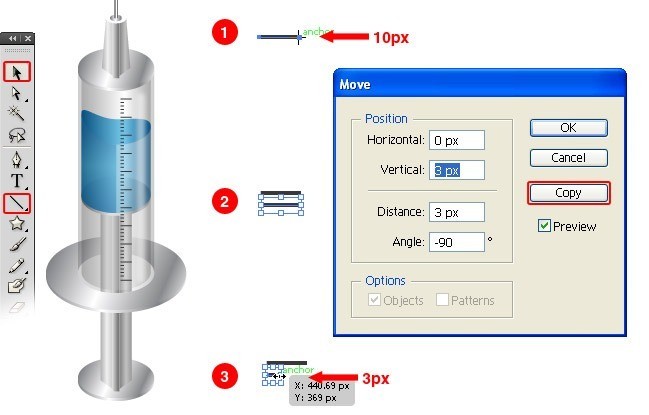
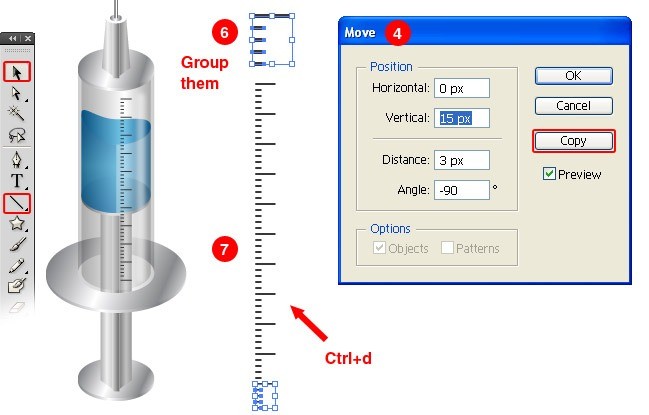
1- By line segment tool draw line with width 10px 2- select the selection tool and hit Enter or Double click on the selection tool to show the move menu, set the Vertical: 3px and Press Copy button 3- rezise the width of the duplicated line to 3px
Step 34
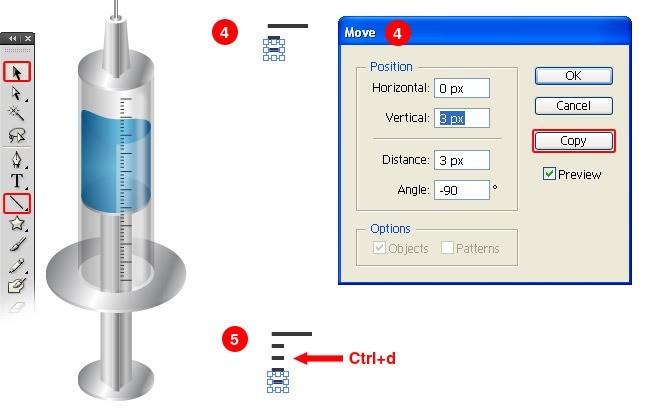
4- Keep selecting the line and hit Enter and set the Vertical: 3px. 5- then hit Ctrl+D two time.
Step 35
6- Group the lines Ctrl+G. 7- Hit enter and set the Vertical: 15px and press copy button, then Ctrl+D 11 times, and group all the duplicated and move it to the Syringe icon.
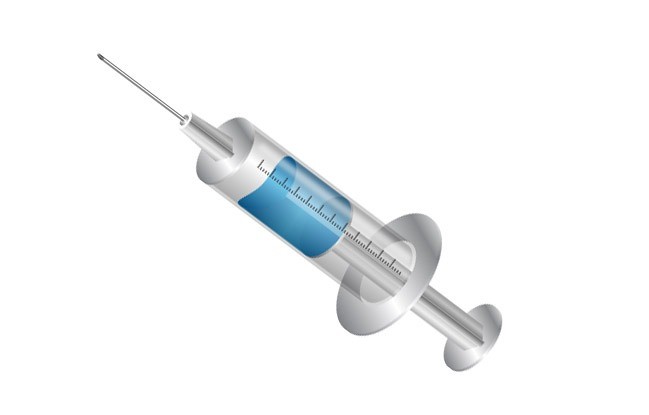
Final
Learn how you can find the perfect collaborator for graphic designers.

melvin
December 30, 2010 at 6:16 pmGreate added to our list
simon
January 21, 2011 at 9:22 pmWhen I get to Step 18
Move back the mask to the circle, then group the upper rectangles Ctrl+G then select this rectangles and the mask and hit Ctrl+7 to make the mask on the rectangles.
I try this step, but when I group the upper rectangles and the mask, then hit Ctrl+7, everything disappears. My rectangles are no longer visible. What can I do to make my image look like the one in Step 19?
Thanks
S
mameara
January 23, 2011 at 8:10 amDo not group the layer mask with the rectangles!, and keep the layer mask up all the shapes.
Tutorial Lounge
April 4, 2011 at 10:00 amreally nice work you did in this tutorial.
Brett Widmann
April 7, 2011 at 12:54 amThis was a really fun tutorial! Thanks for sharing.
Trishona
December 1, 2011 at 6:56 amThis is really a cool tutorial. Thanx for sharing.
ululf01
March 5, 2013 at 6:39 amVery nice tutorial. I am trying to make this one. Thanks for sharing.
Lpm UMA
December 28, 2020 at 3:11 pmnice posting