In this tutorial, I will learn you how to create a shiny metal icon using adobe illustrator CS3 as seen in the featured photo. this tutorial contains amazing tips and techniques, I hope you successfully make it similar to the design!
Step 01
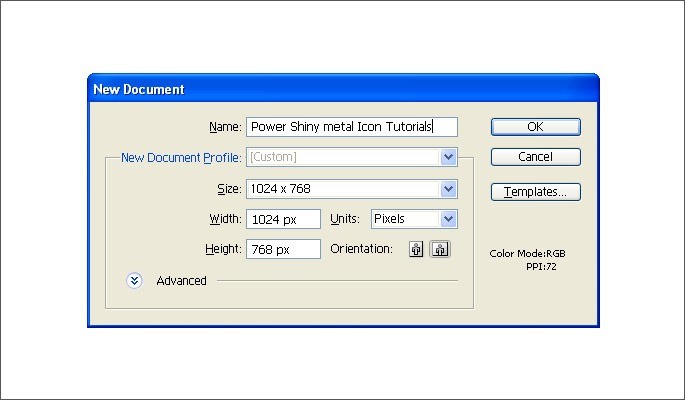
Open the adobe illustrator and create new page, select the size (1024px*768px) as the below.
Step 02
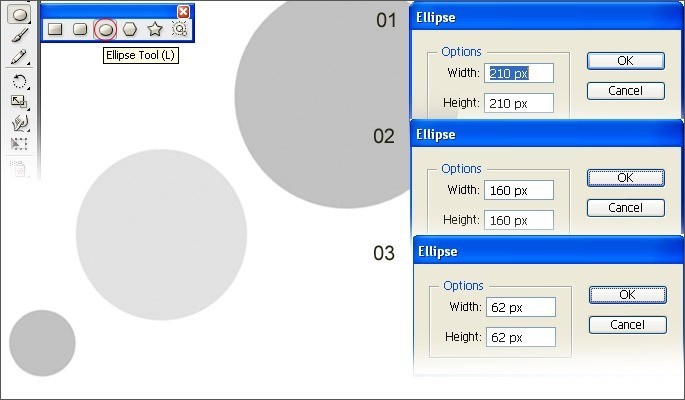
Create three circles using (Ellipse Tool) select Ellipse tool and right-click on the stage the Ellipse window options will appear, and set the options and colors for the three circles as in the following:
– Circle1 size: “210px*210px ” color: “#c1c1c1”
– Circle2 size: “160px*160px” color: “#e2e2e2”
– Circle3 size: “62px*62px” color: “#c1c1c1”
The following step is basic. if you know how to arrange the shapes please skip this step!
Step 3 “Arrange the shapes?”
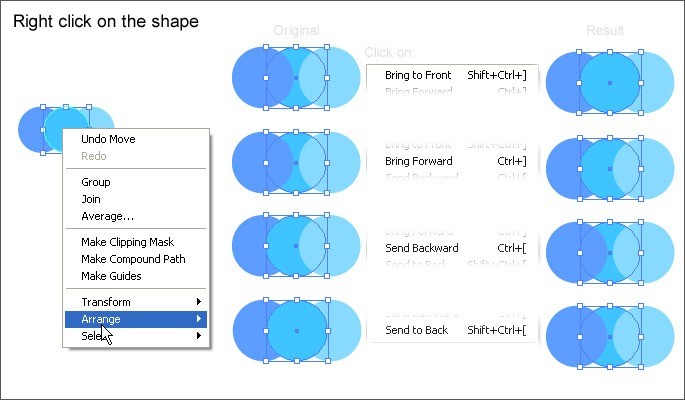
The Arrange in adobe illustrator is to arrange the shapes over each other, for example, if you select a shape that behind other shapes then you select it and press right-clicks on the mouse then select “Arrange > bring to front” from the menu it will bring the shape to the front of all the shapes.
Step 4
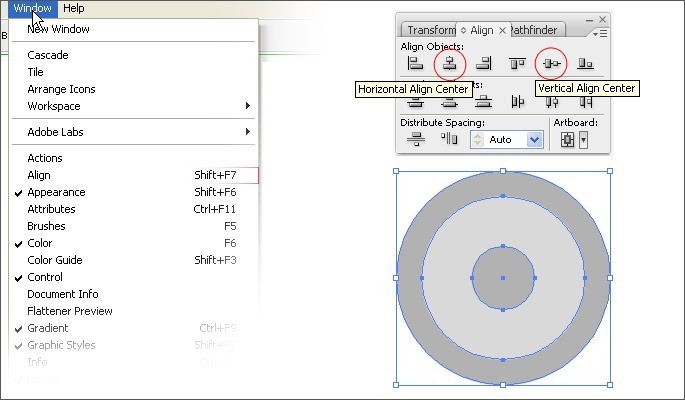
Arrange the circles and set the smallest circle to the front the largest circle to the back to appear, then select the circles and open the align palette from “window>align” or shift + f7 and select the Horizontal Align Center and the Vertical Align Center, to align the circles to the center.
Step5
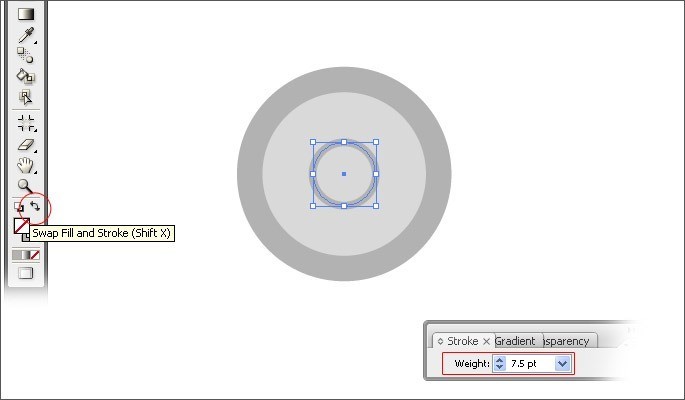
Select the small circle click Swap Fill and Stroke (shift+x) then from the stroke palette make the stroke weight:7.5pt .
Step6
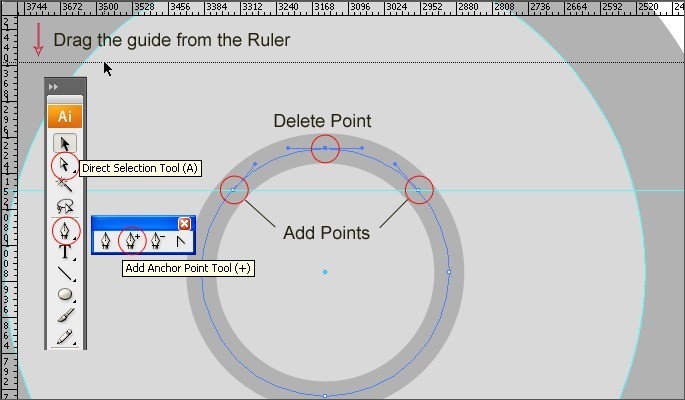
In this step, we need to create a power icon. Press Ctrl+R to show the ruler and drag a guide to the top of the small circle, and add two points by Add Anchor Point Tool then select Direct Selection Tool and click on the top point and hit delete from the keyboard.
Step7
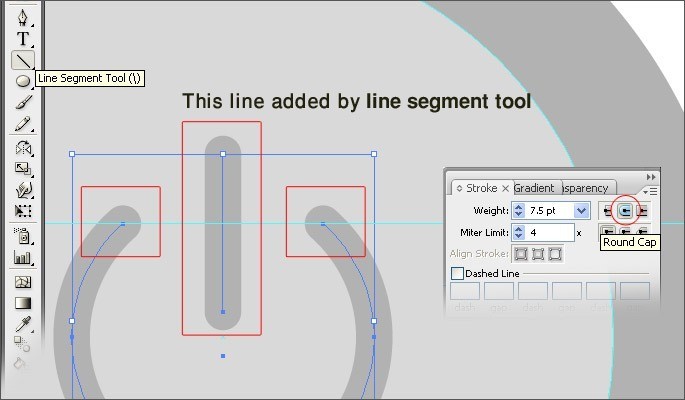
Select Line Segment Tool and draw it as below, then select the power icon and open stroke palette and click on the Round Cap. to round the endpoint of the strokes.
Step8
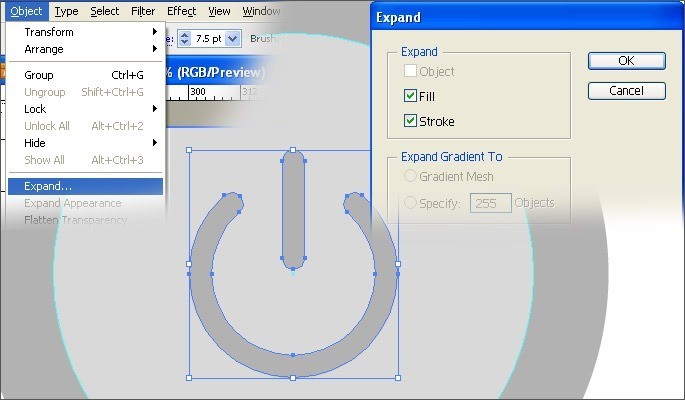
Keep selecting the power icon and go to Object>>Expand then click Ok on the expand window to convert the stroke to fill color. we do that because we can’t give the stroke gradient color.
Step9
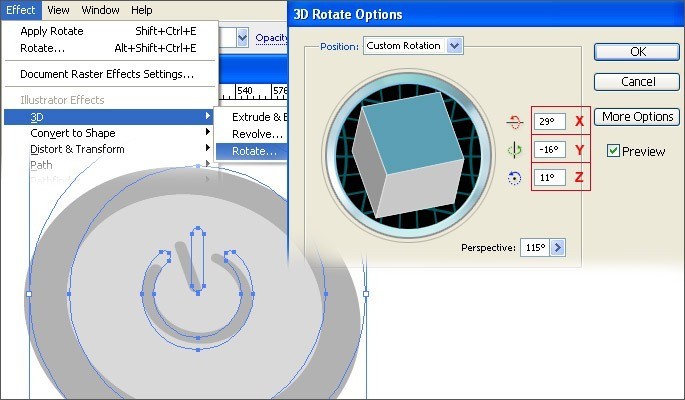
Rotate the shapes. Go to the Effect>>3D>>Rotate from the menu, and put the following values:
X-axis: 29 -?? Y-axis: 16 – Z-axis: 11 and the Perspective: 115.
Step10
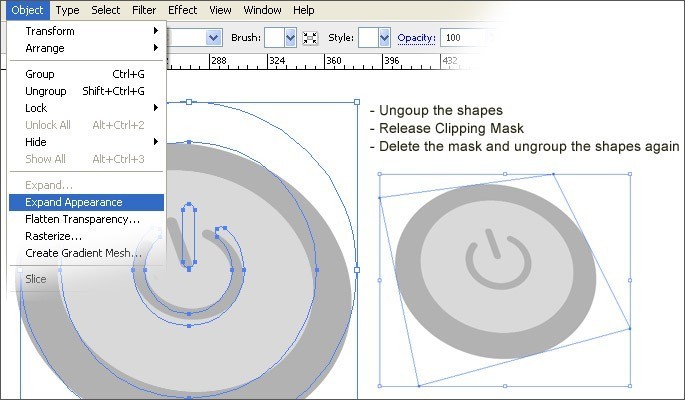
Expand 3D object and clean the shapes. Select the object and click on the Object>>Expand Appearance from the menu, then right-click select Ungroup right-click again select “Release Clipping Mask” then delete the mask *note that the mask appears without stroke and fill color. then select the shape and right-click again ungroup.
Step11
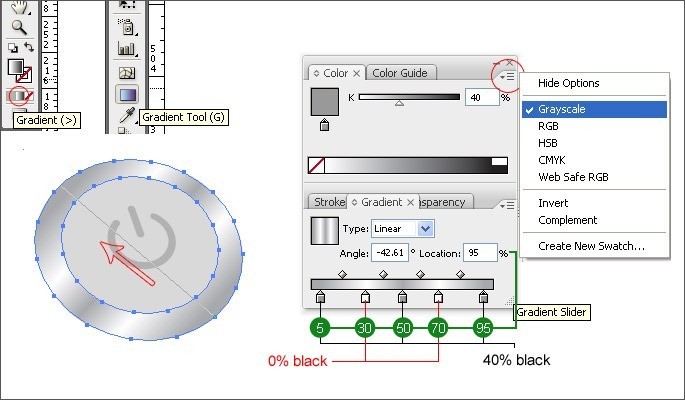
Coloring, select the gray frame and click on the Gradient icon where placed in the bottom of the Tools, and open the gradient palette, then add five gradient points on the gradient slider. we will start from the left point in the gradient slider:
When you select any point choice the Grayscale from the color options
Point01: Color: 40%K, Location:5% – Point02: Color: 0%K, Location:30%
Point03: Color: 40%K, Location:50% – Point04: Color: 0%K, Location:70%
Point05: Color: 40%K, Location:95%
Step12
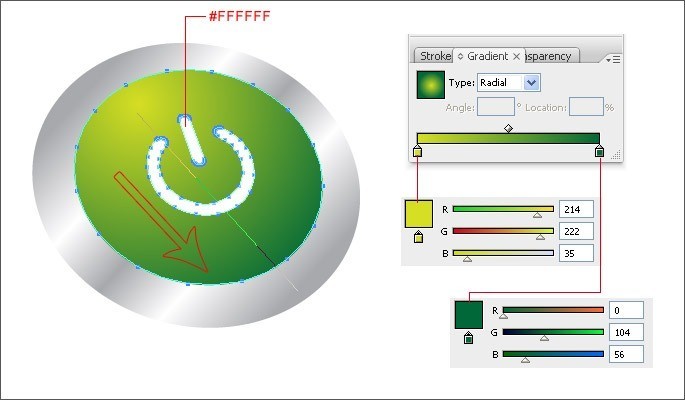
Coloring the inner circle. first, select it and click on the gradient from? tools choose the color for the left point on the gradient slider Red: 214 – Green: 222 – Blue: 35 and for the right point on the gradient slider Red: 0 – Green: 104 – Blue: 65 then select the gradient tool and start a drag from the top left corner to the bottom right corner as below image, then select the power icon and choice the white color (#FFFFFF).
Step13
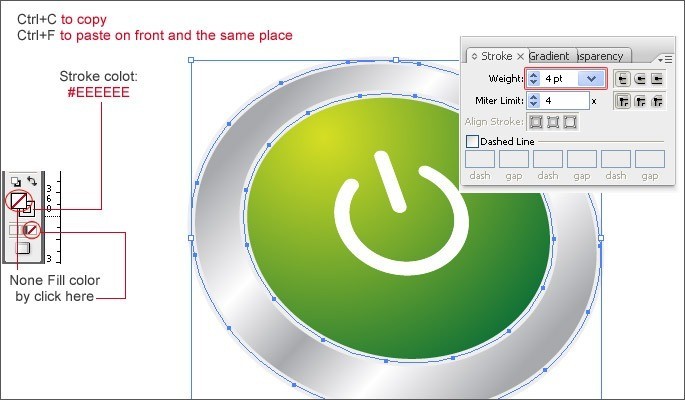
Select the metal frame and hit Ctrl+C and Ctrl+F to copy it and paste it in the same place, click fill color icon on the tools then click none to make empty fill color, now select the stroke with 4pt weight and light gray color (#EEEEEE).
Step14
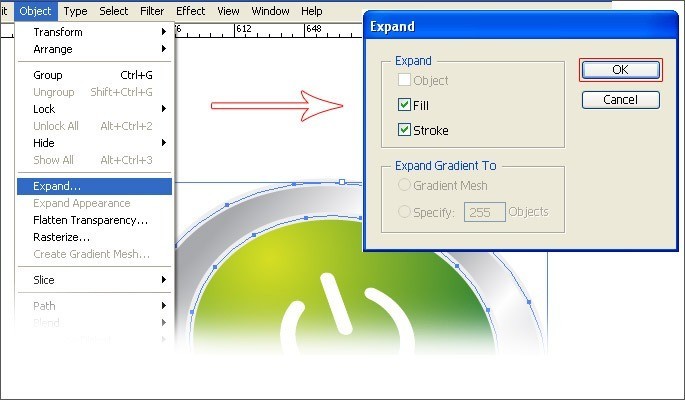
Select the stroke and go the? Menu >> Object >> Expand and from the expand window hit ok to convert the stroke to fill color. again we do that because we can’t give the stroke gradient color.
Step15
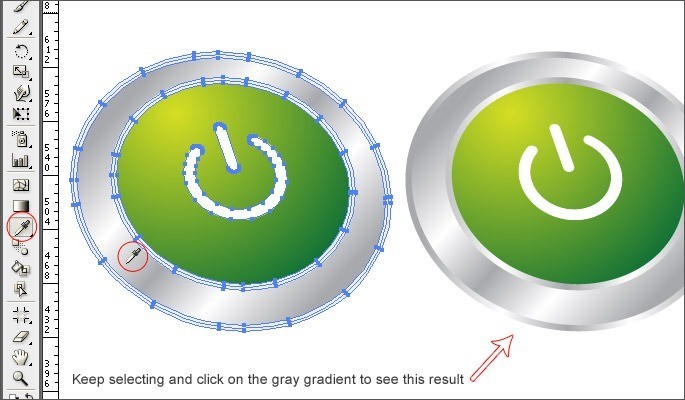
Now keep select the expanded object and pick the Eye Dropper tool then click on the frame to fill the same gradient.
Step16
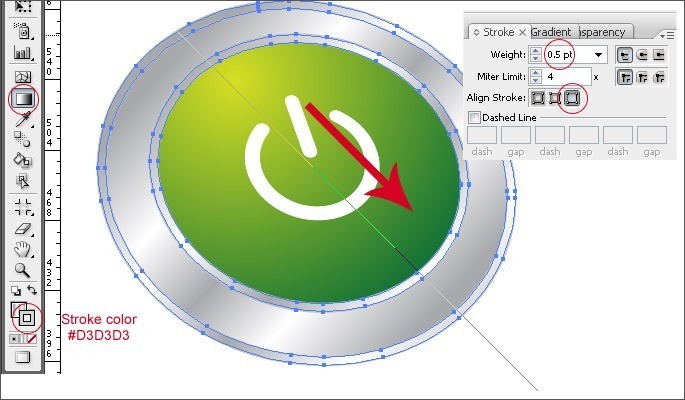
Select the Gradient tool and start a drag from the top left corner to the bottom right corner and apply the stroke with 0.5pt weight and gray color (#D3D3D3).
Step17
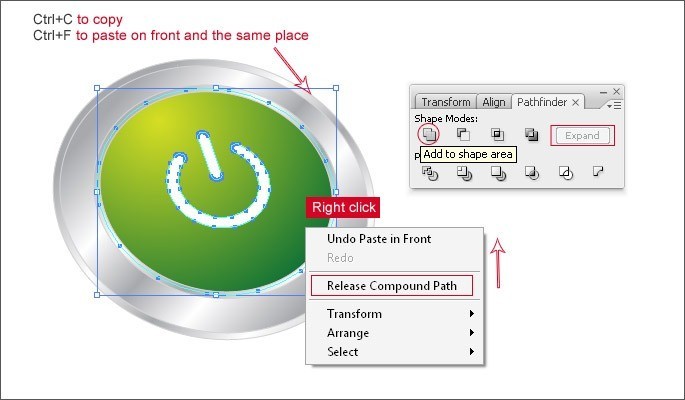
Select the green circle and copy and paste it in the same place, note that the power icon appear as part of the green circle, but it is not! That’s happened when we do Expand Appearance for the 3D rotate, so we can fix it just keep selecting the duplicated green circle and right-click on it and select Release Compound Path, that will separate the power icon, now keep selecting the objects and open pathfinder palette and select Add to shape area icon and the expand button will be active click on it.
Step18
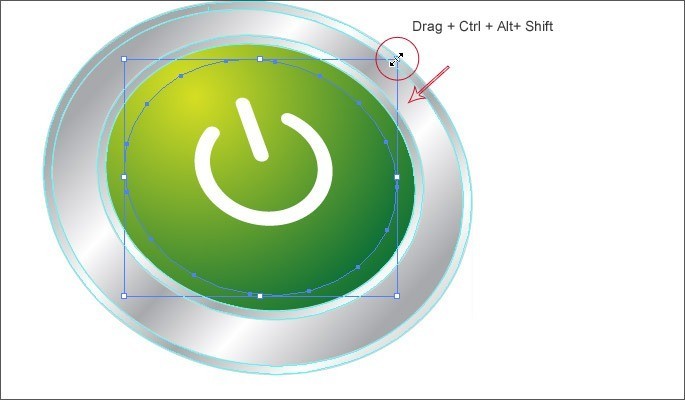
Now just re-size the duplicated green circle by click on the top right point of the bounding box and start drag to the left bottom corner and keep pressing the Ctrl+Alt+Shift on the keyboard.
Step19
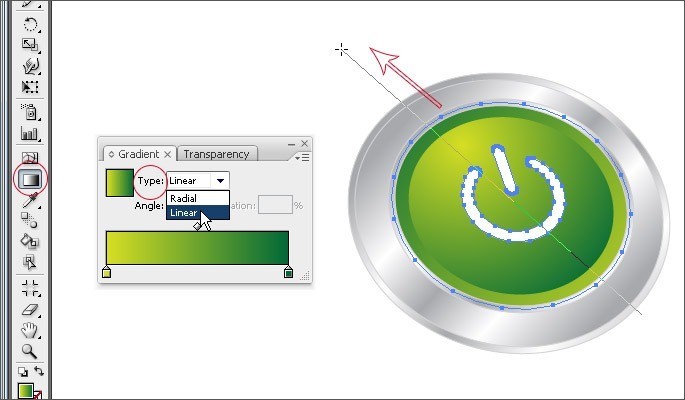
Select the bigger green circle and click on the gradient tool then open the gradient palette and select the type Linear and start a drag from the bottom right corner to the top left corner and keep dragging to the out of the object as showing below.
Step20 (The final step)
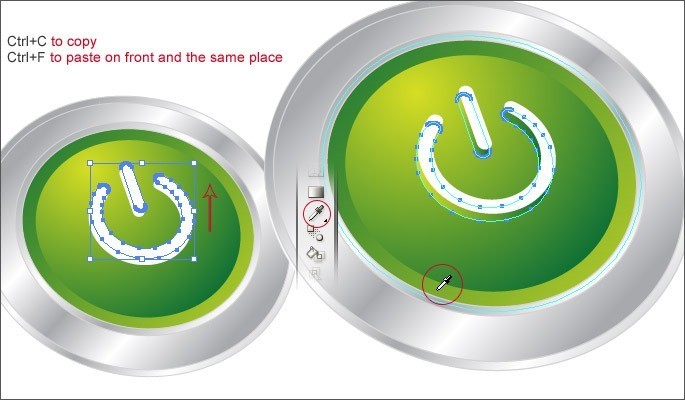
Duplicate the power icon, and move it up by pressing on the up arrow on the keyboard, then select the bottom power icon and click on the Eye Dropper tool then pick the green gradient color from the bigger green circle.
Final:
Beautiful! I hope you enjoy this tutorial.


designi1
June 30, 2010 at 3:17 pmThe final result its pretty good. Great tut – congrats!
chrome
July 5, 2010 at 2:03 pmnice tut man
keep it up 😉
Geneva Mcdaris
July 11, 2010 at 3:28 pmBecoming a Kyani distributor is a fun, affordable way to help you realize the financial freedom that many dream about.
Movie Rental
July 12, 2010 at 10:29 amHey admin, very informative blog post! Pleasee continue this awesome work.
SSchell
October 15, 2010 at 10:02 pmI’m stuck!!
“Expand 3D object and clean the shapes. Select the object and click on the Object>>Expand Appearance from the menu, then right click select Ungroup right click again select Release Clipping mask then delete the mask *note that the mask appear without stroke and fill color. then select the shape and right click again ungroup .”
I get to here, then i get stuck…then delete the mask – where do i delete the mask? Sorry, a little new 🙂
mameara
October 17, 2010 at 5:39 amwhen you create 3D Object and expand it, then ungroup the shapes, it still has the mask shape, so you do release clipping mask, it will release the mask with keep selecting this mask, so hit delete on the keyboard and all done! :).
Brett Widmann
January 9, 2011 at 3:40 amThis is a great tutorial! Thanks for sharing.
Sara
July 15, 2011 at 12:27 pmGreat and fun tutorial! Thanks for sharing 🙂
Araceli
September 15, 2011 at 8:30 amamazing post and like your weblog quite a lot and both of you are seeking very cute !